
Smart Home for Renters: a Complete Beginner’s Guide
You want a smart home, but you don’t own your walls. Maybe your lease bans drilling. Maybe your landlord has the only key. Maybe you’re tired of buying gadgets that only make sense for homeowners.
That’s the real problem behind “Smart Home for Renters.” It’s not a lack of good devices; it’s a lack of guidance on which ones respect a lease, a security deposit, and a termination date that’s always closer than it feels.
This guide walks through what a smart home realistically looks like.
This guide shows what a smart home realistically looks like when you rent: what to buy first, what to skip, how to avoid landlord conflicts, and how to build a setup you can pack into two boxes when you move.
No drilling. No rewiring. No permanent changes your landlord hasn’t approved. That plug-in, stick-on, or retrofit over what’s already there: smart plugs, screw-in bulbs, adhesive sensors, a retrofit lock, and a battery camera.
Skip anything that requires drilling, rewiring, or replacing your existing deadbolt. Start with lighting and a smart plug or two; add a retrofit lock if security is a priority; then layer in Wi-Fi coverage and cameras once the basics are working.
- Smart Home for Renters: a Complete Beginner's Guide
- Key takeaways
- What "Smart Home" Actually Means When You Rent
- The Three Rules of a Renter-Friendly Smart Home
- Where to Start: Your First Purchase
- Smart Lighting: The Easiest Renter Upgrade
- Smart Locks: The Feature Renters Ask About Most, and Worry About Most
- How Retrofit Locks Work
- Choosing Between Retrofit and Full Replacement
- Home Security: Cameras and Sensors Without Permanent Installation
- Voice Assistants and Hubs: Do You Actually Need One?
- Smart Climate Control Without a Thermostat
- Choosing Your Ecosystem: Alexa, Google Home, Apple Home, or Matter-First
- Building It Room by Room
- Smart Homes for Roommates and Shared Apartments
- Putting It Together: A Realistic Renter Setup by Budget
- A Practical Scenario
- Common Mistakes Renters Make
- Privacy and Security Considerations
- Moving Out: Packing Your Smart Home
- FAQ About Smart Home for Renters
- Editorial Testing Note
- Do I need my landlord's permission for a smart lock?
- Will smart bulbs work in a fixture without a wall switch?
- Can I use a smart home system without Wi-Fi?
- What happens to my smart lock if the power or Wi-Fi goes out?
- Is it worth buying a hub, or can I skip it?
- How much does a basic renter smart home system cost?
- Can I get a subscription-free security camera?
- Will a smart plug work with a space heater or window AC unit?
- Do smart home devices work if my apartment's internet goes down?
- Should I buy cheap, unbranded smart devices to save money?
- Can I take my smart home devices with me when I move?
- Final Takeaway
Key takeaways
- Avoid permanent changes: Choose plug-in, stick-on, or retrofit devices that require zero drilling or rewiring.
- Start small: Begin your setup with simple smart bulbs and smart plugs before buying expensive locks or cameras.
- Fix your Wi-Fi first: Elevate and center your router to prevent dropped connections in congested apartment buildings.
- Use retrofit smart locks: These install over the interior thumb-turn, ensuring your landlord’s original key still works.
- Buy Matter-certified devices: This standard ensures your gadgets can easily switch between ecosystems like Apple Home or Alexa when you move.
- Use adhesive sensors: Battery-powered door and leak sensors provide cheap, damage-free security monitoring.
- Keep original hardware: Store all original deadbolt parts and lightbulbs safely so you can reinstall them to protect your security deposit.
What “Smart Home” Actually Means When You Rent
A smart home, at its core, is a set of connected devices you can control from your phone or by voice: lights, plugs, locks, sensors, cameras, and thermostats tied together through an app or a voice assistant.
For a homeowner, that might mean a wired smart thermostat, in-wall switches, and a hardwired video doorbell. For a renter, most of that hardware is off the table. Your smart home must work within three constraints every apartment dweller shares:
- You don’t own the fixtures. Light switches, thermostats, and door hardware usually belong to the building.
- You need to reverse everything. Whatever you install has to come off cleanly, without holes, adhesive residue, or a locksmith bill.
- It needs to move with you. Renters relocate more often than homeowners. A smart home that’s bolted to one apartment is money wasted on your next move.
Every recommendation in this guide is assessed by those three constraints first and features second.
The Three Rules of a Renter-Friendly Smart Home
Before buying anything, set ground rules. These three keep you out of trouble with your landlord and your security deposit.
1. If it requires drilling, look for the retrofit version first. Smart locks, doorbells, and cameras now have drill-free alternatives. A drill-free deadbolt retrofit, a peephole-mount doorbell, or an adhesive-backed camera bracket usually exists for the wired version you considered.
2. Favor devices that plug into an outlet or screw into an existing socket. Smart plugs and bulbs don’t touch your building’s wiring. They use outlets and light fixtures already there. This is the fastest, cheapest, lowest-risk category to start with.
3. Check your lease before installing anything on the door or exterior. Most leases are silent on smart bulbs and plugs; no one cares. Many mention door hardware and exterior modifications. A quick read or message to your landlord avoids a bigger conversation later.
Where to Start: Your First Purchase
If you’re building a smart home from zero, resist buying a lock, camera, and full lighting kit on day one. Start smaller and confirm the basics work before expanding.
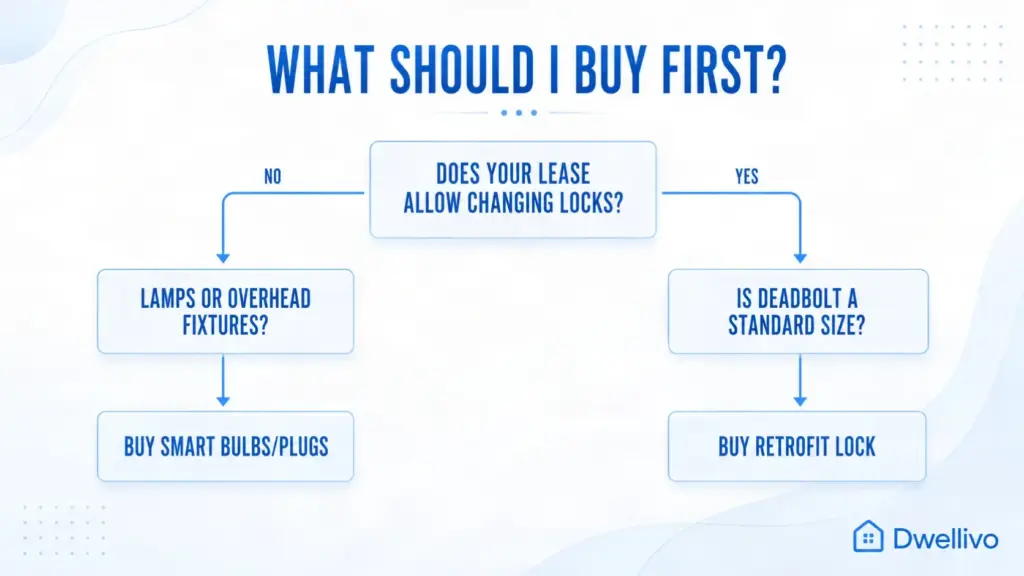
A sensible first order looks like this:
- One or two smart plugs, for lamps or a fan
- A smart bulb or two in your most-used room
- A voice assistant speaker or smart display, if you want voice control
- A smart lock, once you’ve confirmed your deadbolt is a standard size
- A camera or sensor, once you know which entry points actually need monitoring.
This order matters because plugs and bulbs teach you the app ecosystem—Alexa, Google Home, Apple Home, or Matter—before you commit to anything installed on your door. Connectivity: The Foundation Everything Else Depends On
Every smart device in this guide needs a stable network. Weak apartment Wi-Fi is the single most common reason renters’ smart-home setups fail, not the devices themselves.
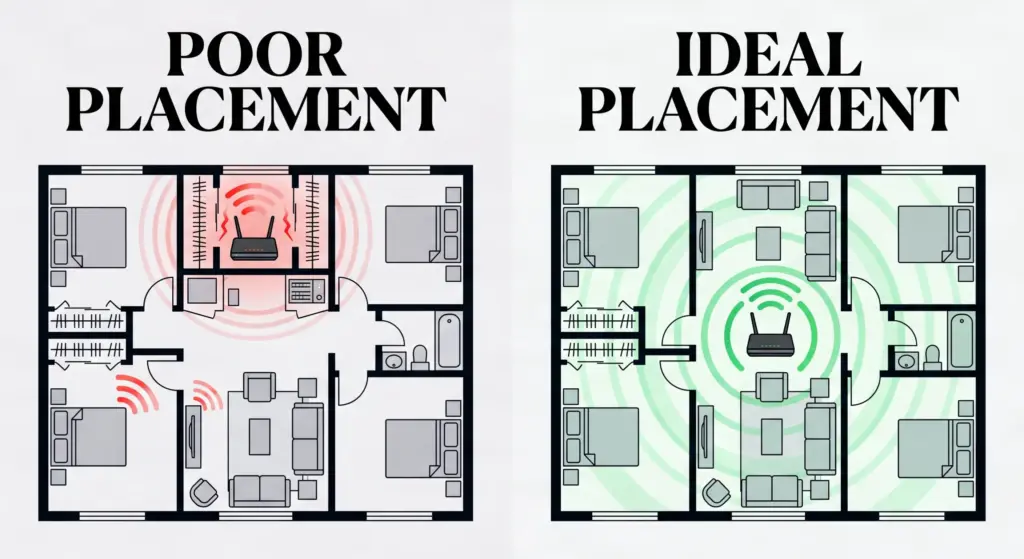
Apartments create Wi-Fi problems homes usually don’t have: thin walls that don’t block much, dozens of neighboring networks competing for the same 2.4 GHz channels, and routers often wedged behind a TV stand or inside a closet.
For most one- and two-bedroom apartments, 400 to 1,100 square feet covering most US rentals, a single well-placed Wi-Fi 6 router is usually enough. Mesh systems with multiple nodes suit larger units, homes with thick concrete walls, or layouts with many dead zones. Buying a three-node mesh kit for a 600-square-foot one-bedroom is usually overkill and wasteful.
A few practical fixes solve most apartment Wi-Fi complaints before spending on new hardware:
- Move the router off the floor and out of enclosed cabinets. Elevated, open placement noticeably improves range.
- Keep the router near the center of the apartment, not against an exterior wall.
- Move congested 2.4 GHz smart devices, plugs, bulbs, and sensors to a dedicated IoT or guest network if your router supports it, so they don’t compete with your laptop or streaming devices.
- If you still get dead zones after repositioning, a two-node mesh kit or a single Wi-Fi extender in the weak room is cheaper than replacing the whole router. Word on Matter
You’ll seYou’ll see the word “Matter” on smart home boxes constantly in 2026. Matter is a connectivity standard developed by the Connectivity Standards Alliance. It lets a single device work across Alexa, Google Home, Apple Home, and SmartThings without separate hubs or bridges for each ecosystem. ters, Matter matters for one specific reason: portability. If you switch apartments and decide to switch from an Echo speaker to a Google Nest setup, Matter-certified devices generally move with you without a full reconfiguration. When two similar products are priced close together, the Matter-certified one is usually the safer long-term buy; it protects you from being locked into one brand’s ecosystem for years.
Smart Lighting: The Easiest Renter Upgrade
Lighting is where almost every renter should start for a simple reason: a smart bulb is not a modification. You unscrew the old bulb, screw in the new one, and connect it to Wi-Fi or Bluetooth through an app. None of that requires landlord approval.
Bulbs vs. Plugs vs. Switches
Option: Smart bulb; Requires: Standard light socket; Best for: Lamps, overhead fixtures with accessible bulbs; Renter risk: None; fully reversible. Option: Smart plug; Requires: Standard outlet; Best for: Lamps, fans, string lights, small appliances; Renter risk: None; fully reversible. Option: Smart switch (in-wall); Requires: Wiring behind the wall plate; Best for: Rooms with hardwired overhead lighting and no separate lamp; Renter risk: Requires basic electrical work; not renter-friendly without landlord approval.
For mosFor most apartments, especially older units with limited or no overhead lighting, the practical path is smart bulbs in lamps plus smart plugs to control the lamps as a backup. This combination gives you app control, scheduling, and voice control without touching a wall switch.ng Bulbs Without Overthinking It
You don’t need color-changing bulbs everywhere. A tunable white bulb, adjustable from warm to cool light, covers most everyday needs: reading light in the evening, brighter light for cleaning or work, and dimmer light before bed.
If you want color for accent lighting or personality, add one or two color bulbs to a single lamp instead of replacing every bulb in the apartment. It’s cheaper and avoids ending up with a dozen bulbs and three different applications to manage.
A multi-layered lighting approach works better than a single overhead fixture in most rentals. A floor lamp in a corner, a table lamp near the couch, and a desk lamp for work give you more control over mood and brightness than one ceiling light. Each lamp can run on a smart bulb or smart plug.
Where Bulbs Fall Short
Smart bulbs only help where there’s a light fixture with an accessible bulb. Recessed can lights, enclosed fixtures, or ceiling fixtures with sealed covers are harder to retrofit and sometimes require a smart switch instead, which usually means asking your landlord first.Smart Device
A smart plug is a small adapter that sits between an outlet and whatever you plug into it: a lamp, fan, space heater, coffee maker, or string lights. It turns anything with a physical power switch into something you can schedule or control remotely without touching wiring. Best dollar-for-dollar renter device on the market. It solves real problems:
- Turning lamps on and off on a schedule while you’re away, for basic presence simulation
- Making sure a space heater or curling iron actually turned off after you left
- Controlling a fan or humidifier without a wall switch
- Adding “smart” behavior to devices that were never designed to be smart
If you’re tracking electricity costs, look for a plug that reports energy usage and check the amperage rating before plugging in anything that draws serious power, like a space heater. Cheaper plugs sometimes cap below what higher-draw appliances need.
Smart Locks: The Feature Renters Ask About Most, and Worry About Most
A smart lock is usually the biggest security upgrade a renter can make and also raises the most questions: Will this void my lease? Will I lose my deposit? Will my landlord be able to get in during an emergency?
The good news is that the “retrofit” category of smart locks was built specifically to answer those questions.
How Retrofit Locks Work
A retrofit smart lock installs over the interior thumb-turn of your existing deadbolt. It doesn’t touch the exterior cylinder, doesn’t require a new keyway, and doesn’t replace any hardware your landlord installed. From the hallway, the door looks completely unchanged. Your landlord’s key and your own physical key still work exactly as before.
Installation typically takes 10 to 15 minutes with a screwdriver, and removal is just as fast. When you move out, you remove the smart unit, reinstall the authentic thumb-turn, and there’s no visible evidence a smart lock was ever there.
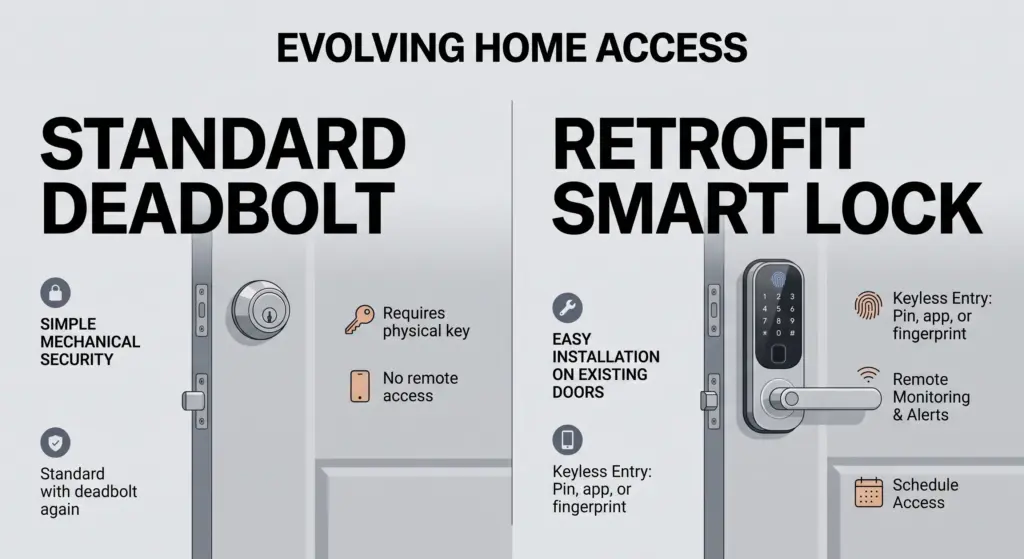
This differs from a full lock replacement, like a touchscreen keypad deadbolt that swaps your entire lockset. These offer more features, larger code capacity, fingerprint unlock, and a more finished look. Still, they replace the landlord’s original hardware, usually requiring a conversation with your landlord and keeping the old deadbolt to reinstall at move-out.
Choosing Between Retrofit and Full Replacement
Factor: Installation; Retrofit lock (interior thumb-turn): screwdriver, 10–15 minutes; Full replacement deadbolt: screwdriver, 20–30 minutes. Factor: Landlord’s key; retrofit lock: still works; full replacement: usually stops working, new keys issued.
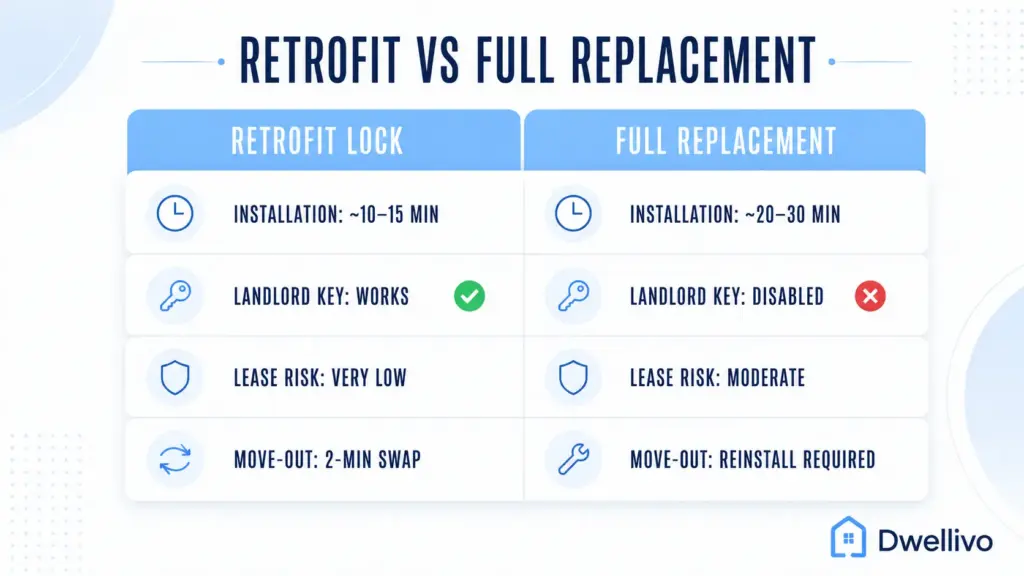
Factor: Lease risk; retrofit lock: very low, no visible change; full replacement: moderate, requires storing original hardware and landlord awareness.
Factor: Features; retrofit lock: auto-lock, app control, guest codes; full replacement: often adds keypad, fingerprint, larger code storage.
Factor: Move-out; retrofit lock: remove and reinstall the original thumb-turn; full replacement: reinstall the original deadbolt and keep the new one for the next place.
Our editorial take: for most renters, a retrofit lock is the safer default. It gives you the core benefits—remote lock/unlock, entry notifications, and temporary access codes for guests or dog walkers—without risking your landlord relationship or your deposit.
Reach for a full-replacement keypad lock only if you specifically need features retrofit locks don’t offer, like fingerprint access or a large number of individual codes for a shared apartment. You’ve confirmed your landlord is fine with it.
Before You Buy: Check Your Door
Retrofit locks aren’t universal. Before ordering one, measure:
- Door thickness, usually a range like roughly 1.2 to 2 inches (about 3–5 cm)
- Deadbolt backset, the distance from the door edge to the center of the bolt, commonly 2 3/8″ or 2 3/4″
- Thumb-turn shape: Since some deadbolts use an unusual shape, the retrofit unit won’t grip properly.
Most manufacturers publish compatibility measurements on the product page. A five-minute check with a tape measure can save you from returning a lock that doesn’t fit.
A Useful Safety Note
Keep a spare physical key somewhere outside the apartment: with a trusted friend, in your car, or in a small lockbox. If the smart lock’s battery dies or the app has an outage, a working key gets you back inside without waiting on a locksmith. Never disable or bypass the physical keyway to “fully commit” to the smart lock; it’s your fallback, and every reputable retrofit lock is designed to leave it intact for exactly this reason.
Home Security: Cameras and Sensors Without Permanent Installation
Security is usually the second priority renters ask about, right after locks. The renter-friendly version of a security system leans on wireless, battery-powered devices with adhesive or clip mounts instead of anything wired into the wall.
Indoor Cameras
An indoor camera is the simplest starting point. Most current models plug into a standard outlet or run on battery, connect over Wi-Fi, and can be placed on a shelf, propped on a stand, or mounted with a small adhesive bracket that leaves no damage.
Two features matter more than resolution for most renters:
- Local storage without a required subscription. A growing number of cameras now record to an onboard microSD card or a small local storage unit at no monthly cost, with cloud storage as an optional paid add-on rather than a requirement. This matters if you want footage history without committing to a subscription for the life of the device.
- Field of view and placement flexibility. A camera that covers a doorway or hallway from a bookshelf is often more useful than a higher-resolution camera stuck in a fixed, less useful spot.
Outdoor and Entryway Cameras
For a balcony, patio, or shared hallway, look specifically for cameras marketed with adhesive or clamp-style outdoor mounts rather than ones that assume a drilled wall mount. Battery-powered and solar-assisted models avoid running a power cable, which is rarely practical in a rental anyway.
A peephole-style video doorbell is the renter equivalent of a video doorbell; it replaces your existing peephole rather than requiring wiring into a doorbell circuit, and it comes off cleanly at move-out.
Sensors: The Quiet, Cheap Workhorses
Door and window contact sensors, plus water leak sensors, are some of the most overlooked renter devices. They’re small, battery-powered, and stick on with adhesive pads; no drilling, no wiring, and usually under $30 each.
A door sensor on your front entry notifies you the moment it opens, which is useful for security and for knowing when a package delivery or roommate has arrived. A leak sensor near a water heater, under a kitchen sink, or by a washing machine can catch a slow leak before it turns into a damage claim against your deposit; it’s arguably one of the highest-value, lowest-cost devices in this entire guide.
What a Renter-Friendly Security Setup Looks Like
For a typical one-bedroom apartment, a reasonable starting security setup comprises:
- One indoor camera covering the main entry or living area
- A door or window sensor on the front door
- A water leak sensor near any major appliance that uses water
- A retrofit smart lock, if not already installed for daily convenience
That combination covers the highest-probability risks: someone entering when you’re not home and water damage, without a single hole drilled or a monthly monitoring contract required.
Voice Assistants and Hubs: Do You Actually Need One?
A voice assistant speaker or smart display isn’t required to run a smart home, but it does make day-to-day control faster; “turn off the lights” beats reaching for your phone every time.
For most renters, the sensible choice is whichever ecosystem you’re already comfortable with. If you have an iPhone, Apple Home fits naturally. If you use Android and Google services, Google Home is the smoother path. Amazon’s Alexa remains the most widely supported by third-party devices, which can matter if you’re mixing budget brands.
You generally don’t need a separate hub device anymore for most lighting, plugs, and sensors; most current products connect directly over Wi-Fi or through Matter. The exception is Zigbee-based ecosystems, like some Philips Hue lighting setups, which use a small bridge to connect bulbs to your network. That bridge is a plug-in device, not an installation, so it’s fully renter-friendly; it just adds one more box to a bag when you move.
Smart Climate Control Without a Thermostat
Renters usually can’t touch the thermostat. It’s wired into the HVAC system, often shared across a building, and almost always off-limits without landlord approval. That doesn’t mean climate is off the table; it just means the approach shifts from “replace the thermostat” to “control the room.”
A few renter-friendly options fill that gap:
- Smart plugs on window AC units, space heaters, or fans. You can schedule them, turn them off remotely if you forgot, or trigger them based on a smart sensor’s temperature reading, all without touching the building’s HVAC.
- Standalone smart thermostat controllers. Some plug-in devices sit near an existing thermostat or vent and use a small sensor plus a smart plug to approximate thermostat-like scheduling for a single room, without modifying the wall unit itself.
- Smart temperature and humidity sensors. A small battery sensor placed in a bedroom or living room gives you real data useful for deciding when to run a fan, a dehumidifier, or a space heater and for catching a stuffy, poorly ventilated room before it becomes a comfort problem.
Our editorial take: for most renters, a smart plug on an existing fan or window unit covers 80% of what a full smart thermostat would do, at a fraction of the cost and with zero installation risk. Save a full climate system for a place you actually own.
Choosing Your Ecosystem: Alexa, Google Home, Apple Home, or Matter-First
Every device in this guide eventually needs an app, and most apps tie back to one of a small number of ecosystems. Picking one early, even loosely, saves you from ending up with five apps and no single place to see your whole smart home.
Amazon Alexa has the widest third-party device support of the major ecosystems, which matters if you’re mixing budget brands like Wyze, Kasa, or Govee with pricier ones. Alexa-compatible speakers are also inexpensive, making it a low-cost entry point.
Google Home integrates tightly with Android phones and Google services, and Google Home’s voice recognition and routines are generally considered strong. It supports most of the same major smart home categories as Alexa, with slightly less third-party breadth in budget brands.
Apple Home is the natural choice if you’re already deep in an iPhone, iPad, and Mac household. It’s historically been pickier about which devices it supports, though Matter has closed much of that gap. Apple Home additionally emphasizes on-device privacy more than the other two.
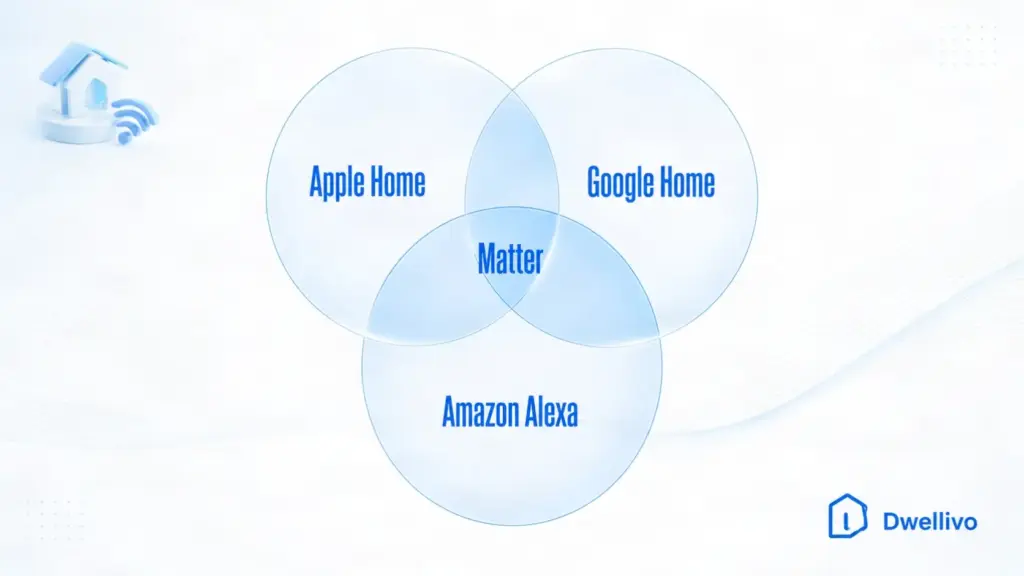
Matter-first is less a specific ecosystem and more a buying strategy. Instead of picking a brand loyalty upfront, you buy Matter-certified devices and let them work across whichever assistant you’re using today or switch assistants later without replacing hardware. For a renter who might change phones, roommates, or apartments before this time next year, buying Matter-first is often the safest long-term bet, even if it means paying a small premium over a non-Matter equivalent.
There’s no wrong answer here. If you already own a speaker or display from one of these infrastructures, start there, and lean toward Matter-certified for any new device going forward.
Building It Room by Room
A useful way to plan a first setup is by room, rather than by device category. Here’s how a typical renter-friendly build breaks down across a one- or two-bedroom apartment.
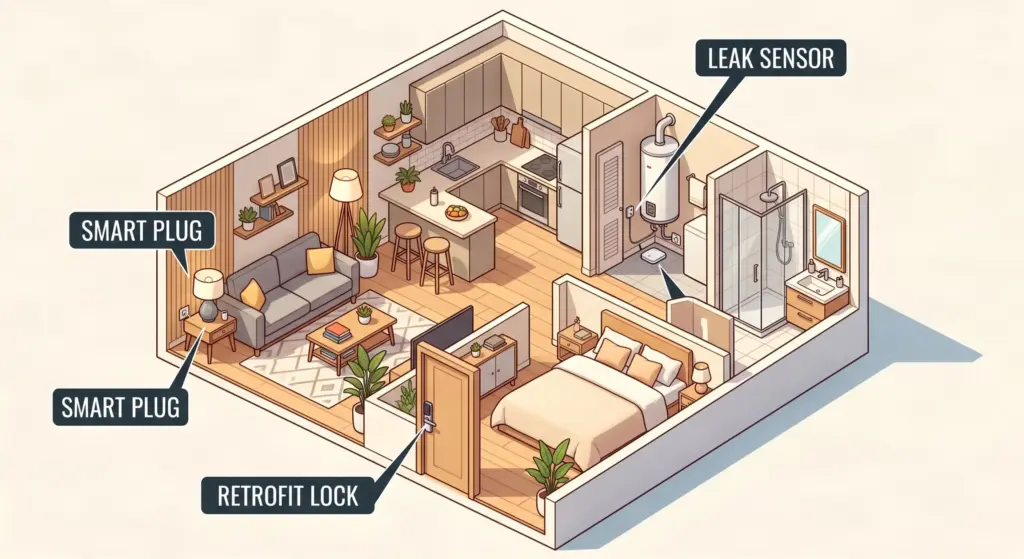
Entryway. This is where security devices earn their keep first. A retrofit smart lock, a door contact sensor, and, if your building allows it, a peephole-style camera or doorbell cover the apartment’s highest-traffic, highest-risk point.
Living room. Start with one or two smart bulbs in lamps, a smart plug for a floor lamp or fan, and, if you want voice control, your primary voice assistant speaker or display here, since it’s the room you likely spend the most time in.
Bedroom. A smart bulb on a bedside lamp with a “wind down” schedule (dimming and warming color temperature in the evening) is one of the most-loved renter upgrades, according to broad smart-lighting reviews. A smart plug for a fan or white-noise machine is a natural add-on.
Kitchen. Kitchens are trickier in rentals; overhead lighting is often hardwired, with no accessible switch-controlled outlet. A smart plug for a coffee maker or countertop appliance is usually the easiest win here, rather than trying to retrofit ceiling lighting.
Utility areas (water heater, washer/dryer closet, under-sink). This is where a $20–$30 water leak sensor delivers outsized value. These areas are the most common source of rental damage claims, and a sensor here can flag a slow leak days or weeks before it’s visible.
Smart Homes for Roommates and Shared Apartments
Shared apartments add a wrinkle: multiple people need access, but not everyone needs, or should have, the same level of control.
A few practices make shared smart homes work smoothly:
- Give each roommate an individual smart lock code, rather than one shared code. If someone moves out or a code needs to be revoked, you’re not stuck re-coding everyone else’s access too.
- Use a shared account or family group in whichever app ecosystem you’ve chosen, so everyone can control lights and plugs from their own phone rather than relying on one person’s account as the single point of failure.
- Agree on camera placement before installing one. Indoor cameras pointed at shared living spaces raise reasonable privacy questions among roommates. A quick conversation before installation avoids friction later; this applies even more if a camera has a microphone that could pick up conversations.
- Split cost by device, not evenly by total. It’s common for one roommate to want a security camera and another to only care about lighting. Buying based on interest, rather than splitting every purchase evenly, tends to reduce disagreements.
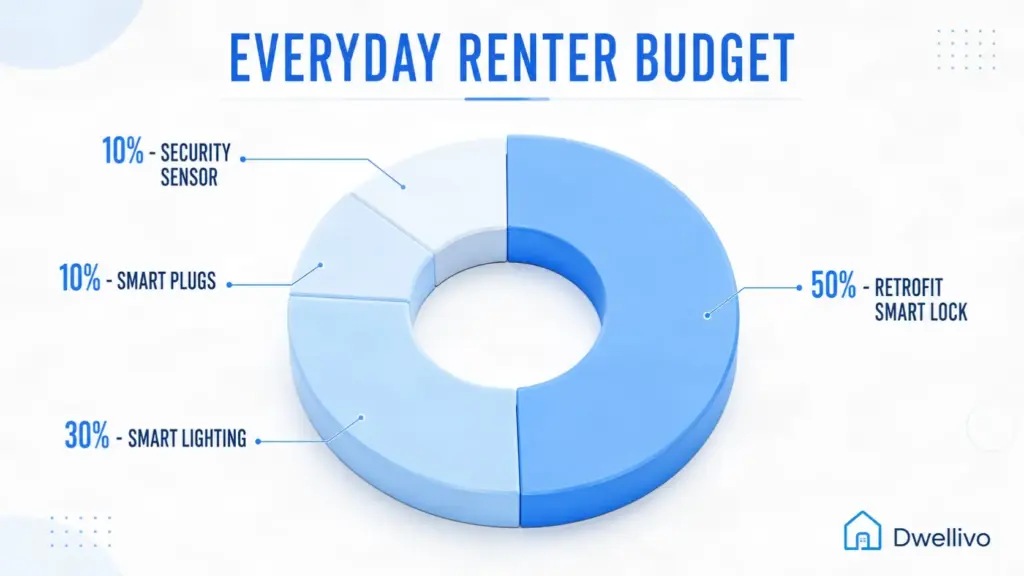
Putting It Together: A Realistic Renter Setup by Budget
Not every renter wants or needs the same setup. Here’s how a sensible build looks at three different budget levels.
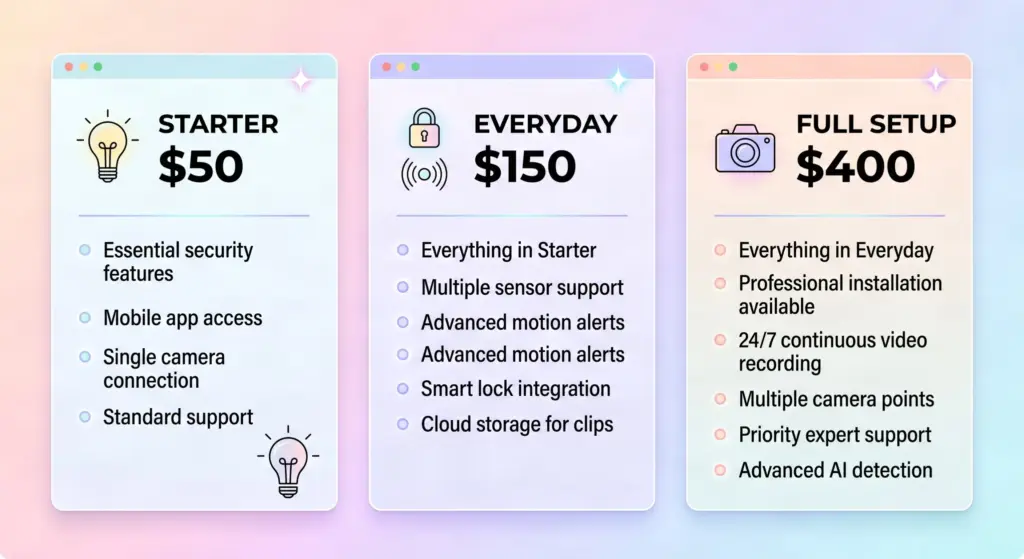
Budget: Starter (~$50–$100); what it covers: Basic convenience, no security add-ons; typical devices: 2 smart bulbs, 1 smart plug. Budget: Everyday (~$150–$300); What it covers: Convenience plus core security;
Typical devices: 4–6 smart bulbs, 2 smart plugs, a retrofit smart lock, 1 door sensor. Budget: Full setup (~$400–$600); what it covers: convenience, security, and monitoring.
Typical devices: Everyday tier plus an indoor camera, a leak sensor, and a voice assistant speaker.
None of these tiers require a router upgrade unless you’re already experiencing Wi-Fi dead zones; if so, budget separately for a stronger router or a compact two-node mesh kit before adding more devices that depend on a steady connection.
A Practical Scenario
Imagine moving into an older one-bedroom apartment with no smart devices, thin walls, and a landlord who’s clear about no drilling.
A reasonable first month might look like this: week one, a smart plug for the lamp and a couple of smart bulbs in the bedroom and living room. Week two, after confirming the app and ecosystem feel right, a retrofit lock on the front door since the deadbolt is a standard size.
Week three, a door sensor and a leak sensor near the water heater, since the unit is older and leaks are a real risk. By the end of the month, the apartment had meaningful convenience and security, and every device came off with it during the next move; nothing was left behind, nothing to explain to the landlord.
This is an illustrative example, not a personal account; the point is the pacing, not a specific product list.
Common Mistakes Renters Make
- Buying a full smart lighting kit before checking outlet and fixture access. Some older apartments have very few accessible light sockets. Count your usable sockets before buying bulbs.
- Choosing a full-replacement smart lock without telling the landlord. Even when it’s technically reversible, an unannounced deadbolt swap can create unnecessary friction. A quick warning avoids that entirely.
- Ignoring Wi-Fi placement. A weak signal causes more device dropouts and “my smart home doesn’t work” complaints than any hardware defect.
- Mixing ecosystems without checking compatibility first. A Wyze camera, a Kasa bulb, and an Apple Home speaker can usually coexist, but not every combination talks to every app equally well. Check compatibility before buying, not after.
- Skipping a spare physical key for a smart lock. This is the single most common regret owners report after a battery dies at the worst possible time.
Privacy and Security Considerations
Any device with a camera, microphone, or door-access control deserves a closer look before it goes in your home. The core guidance below follows current consumer-protection recommendations from the FTC and cybersecurity guidance published by NIST:
- Set a unique, strong password for every smart home app account, turn on two-factor authentication if offered, and never reuse a password from another account.
- Change default router and device credentials as soon as you set them up, rather than leaving factory settings in place.
- Review what a camera or lock manufacturer does with your footage or entry logs, specifically whether local storage options exist and whether cloud data is encrypted.
- Update device firmware when prompted rather than ignoring notifications; most security patches for smart locks and cameras ship this way.
- Disable remote-access or always-listening features you don’t actually use, since every enabled feature is one more potential entry point.
- If you share an apartment, use individual access codes on a smart lock instead of one shared code, so you can revoke access for a single roommate or guest without changing everyone’s code.
Moving Out: Packing Your Smart Home
One underrated advantage of a renter-friendly setup is how easy it is to relocate. Before your last walkthrough:
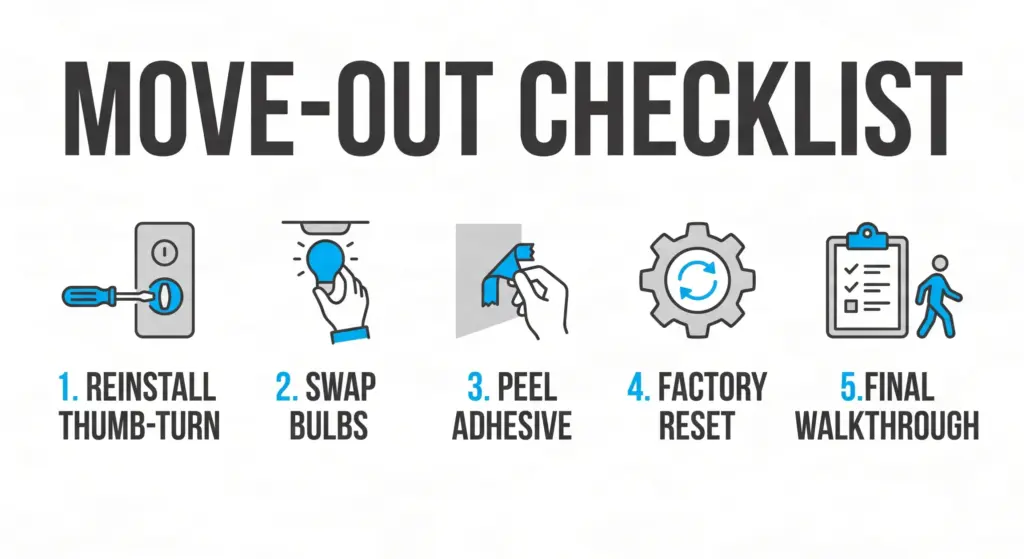
- Remove the retrofit lock and reinstall the authentic thumb-turn; keep the first hardware in a labeled bag from day one so this step takes two minutes, not twenty.
- Unscrew smart bulbs and swap in basic replacement bulbs so the apartment isn’t left dimmer than you found it.
- Peel off adhesive-mounted sensors and cameras slowly, since cold removal can sometimes damage paint; a hairdryer on low heat softens most adhesive before peeling.
- Factory-reset devices in their apps before your next setup, so old Wi-Fi credentials don’t linger on a device you’re about to plug into a new network.
- Do a last walkthrough for anything wall-mounted with adhesive strips; these are the easiest things to forget behind a door or above a light switch.
FAQ About Smart Home for Renters
Editorial Testing Note
Do I need my landlord’s permission for a smart lock?
For a retrofit lock that only replaces the interior thumb-turn and leaves the existing exterior hardware untouched, most leases don’t require permission, since nothing visible or permanent changes. For a full-replacement keypad lock, check your lease or ask your landlord directly, since you’re temporarily removing their hardware.
Will smart bulbs work in a fixture without a wall switch?
Yes, as long as the fixture stays powered. If a wall switch controls the outlet or fixture, leave that switch in the “on” position and control the bulb through the app or voice assistant instead.
Can I use a smart home system without Wi-Fi?
Some devices support Bluetooth-only control from a phone that’s physically nearby, but most core features, remote access, voice control, and automations require Wi-Fi. A steady connection is close to a requirement for a useful setup.
What happens to my smart lock if the power or Wi-Fi goes out?
Retrofit and full-replacement smart locks both run on battery, independent of home Wi-Fi or building power, so a local outage doesn’t lock you out. If the lock’s own battery dies, your backup physical key opens the door.
Is it worth buying a hub, or can I skip it?
Most renters can skip a dedicated hub in 2026. Wi-Fi-based devices and Matter-certified products connect directly to your network or through your voice assistant’s app. A hub is mainly useful if you’re building a larger Zigbee-based lighting setup.
How much does a basic renter smart home system cost?
A useful starting setup, a couple of smart bulbs and a smart plug, typically costs $50 to $100. Adding a retrofit lock and basic sensors brings a fuller setup to roughly $150 to $300.
Can I get a subscription-free security camera?
Yes. Several current camera models record locally to a microSD card or built-in storage with no required monthly fee, reserving subscriptions for optional extras like extended cloud history or advanced AI detection.
Will a smart plug work with a space heater or window AC unit?
Most will, but check the plug’s amperage rating first. Space heaters and window AC units draw more power than lamps or fans, and a budget smart plug rated for lighter loads can overheat or trip under that demand. Look for a plug specifically rated for high-wattage appliances before using one this way.
Do smart home devices work if my apartment’s internet goes down?
Locally controlled functions, a smart lock’s physical keypad, a camera’s motion-triggered local recording, and a bulb’s manual switch usually still work. Anything that depends on remote access, voice assistant commands, or cloud notifications will pause until the connection returns. This is another reason stable router placement matters more than any single device’s specs.
Should I buy cheap, unbranded smart devices to save money?
Be cautious. Unbranded devices from unknown sellers sometimes skip basic security practices, like encrypted connections or consistent firmware updates, and support often disappears if the seller stops operating. Sticking to established brands with a track record of firmware updates is worth the modest price difference, especially for anything with a camera, microphone, or door-access function.
Can I take my smart home devices with me when I move?
Yes; that’s the entire premise of a renter-friendly setup. Bulbs unscrew, plugs unplug, retrofit locks come off with a screwdriver, and adhesive-mounted sensors and cameras peel away cleanly with a little care. Factory-reset each device before your next move so it’s ready to reconnect to a new Wi-Fi network without leftover settings from your old apartment.
Final Takeaway
A smart home doesn’t require ownership. It requires picking devices that respect the fact that you’re renting: plug-in over hardwired, retrofitted over replacement, and adhesive over drilled. Start with lighting and a plug or two, add a retrofit lock once you’ve measured your door, layer in a camera and sensors for security, and fix your Wi-Fi placement before blaming any device for a dropped connection. Build in that order, and you’ll end up with a setup that improves your day-to-day life and packs up as easily as it went in.
If you’re ready for the next step, our guide to improving Wi-Fi in an apartment covers router placement and mesh systems in more depth, and our smart lock buying guide breaks down specific retrofit models by door type and budget. For ongoing coverage of renter-friendly tech, explore the rest of the Smart Home category on Dwellivo.
2 thoughts on “Smart Home for Renters: A Complete Beginner’s Guide to 7 Easy, Drill Free Upgrades”